
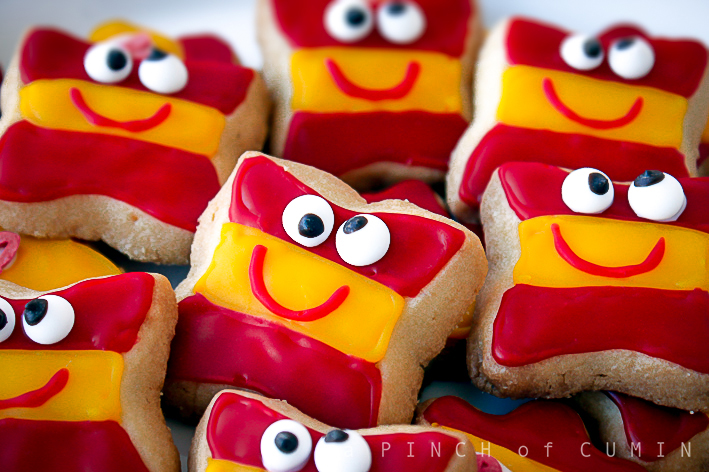
Decorated cookies (first attempt)
As it could not be in any other way, I publish these little cookies in the National Hispanic Day, and with them I pay tribute to the country that saw my birth. I have to say that I have been waiting for a few months to publish them, since I baked them in summer to put a color touch in a barbecue that was organized by the Spanish community from the office, and I have no doubt that the wait has been worth it. The original recipe is from bakemania.com, and as usual I have versioned it to my own understanding (here I write the one I have done).
Beyond their appeal, which is so attractive to children and elderly, they ended up being very tasty, in fact the were gone in 5 minutes, and some people even put some in their pockets to give them to their children. So as a first attempt, and despite the countless hours that I was painting and making eyes while willing to devour them due to the smell, I am very happy with the result, and I will have to keep polishing the finish over the next attempts. And a word of warning: when you are encouraged to cook this recipe, make sure that you have loooots of hours ahead so that there is enough time for them to dry between paint and paint, and most of all, have an idea beforehand of the design you want to achieve.
And cheers for Spain!
")
Ingredients for approx. 50 cookies
Cookie cutters
250gr of non-salted butter
180gr of white sugar
1 big egg
550 gr of all-purpose flour
1/2 teaspoon of fleur de sel (flower of salt)
Different colors of royal icing (in this case I have bought yellow and red already done)
For the eyes: 2 egg whites, icing sugar, a piece of dark chocolate and a piping bag
Sugar letters or any other thing you can think about to decorate (optional)

Directions
First of all, butter to room temperature. A few hours before you start with the cookies (or even the night before if you are going to do them first thing in the morning), take the butter out of the fridge and let it soften at room temperature. You can also do it in the microwave, but it will be warm afterwards and you will have to wait for another while also. On top of that, as far as I can I always use natural procedures that, although they take time, those are the ones I recommend since you really appreciate the difference afterwards.
In a big bowl mix butter with sugar for around 1 minute (if you have a mixer, much better, but otherwise you can do it by hand and this way you avoid some gym hours 😀 ). When you have a whitish batter, that means that you can rest.
Add the egg and whisk it inside the bowl until homogeneous.
In another bowl mix sifted flour (it’s important that you sift it, there is a big difference with those terrible lumps) and fleur de sel and mix it well. Add the mixture of the first bowl into the second one and mix it until homogeneous.
And now the funny part comes, with the rolling pin in your hands. Make a ball out of the batter and place it on top of a transparent film. Cover it with another sheet of transparent film and with the help of the rolling pin (and also a couple of wood guides on its sides), start flattening it. I have done it with a thickness of 0.5cm more or less, and it has been by approximation since I did not have wooden guides, but more or less it has the same thickness all over.
Put the flatten batter in a chopping board or completely flat tray and put it into the fridge so that butter harden again for at least 1 hour.
After this time, take the batter out from the fridge and start cutting it with your favourite cookie cutters. As during the time you are cutting the butter will soften again, it is necessary that once cut, you repeat the procedure of the fridge, although this time it could be only 15 minutes (if you let them there for a bit more time, no problem).
")
Preheat oven to 180ºC for 10 minutes and bake them in the oven tray, where you have already put baking paper, for about 15 minutes to the same temperature. (baking time could change according to the thickness of your cookies, don’t take your eyes off it). At half time I have given them a turn so that they are brownish both sides, but you can avoid this step.
Once they are baked, let them retrieve room temperature before taking the paintbrush 😆 .
Once they are cool (ideally after at least 5 hours or even the next day), start painting the outline of what it will be your color areas. In this case I have done the outline with the same colors (red and yellow) because in the flag there are no other outline colors, but you could also do it with white or black, as you prefer according to your design.
To do the outline I have used a very thin piping bag tip, because this way I could do in an easier way all the outlines of the cookies. Let them get dry for at least 5 hours (or the time indicated by the manufacturer of your royal icing) before continuing with the process.
In the meanwhile you can do the eyes, for example. Whisk egg whites until stiff and add icing glass until you have a dense mixture. Fill in the piping bag and press slowly until you release very small drops in top of a baking paper. Let them dry for 3-5 hours, depending on the humidity of the place where you live. When they are dry, melt chocolate, and with the help of a piping bag with a very thin tip, or even with a small toothpick, paint the iris of the eyes.
After the royal icing drying’s time, use a bit bigger piping bag tip to fill the areas that you have outlined and let it dry for another 5 hours.
And now, give free rein to your imagination to place the eyes (I have sticked them also with bought royal icing), the smiles you want, suggar letters, etc.
Easy, huh? The procedure has no complication, but I want to believe that the finish of the paint is just a matter of practice 😉 .
To be considered
If you do not have fleur de sel, use just salt, but definitely the nice flavour I got was thanks to fleur the sel.
If you want to do your own royal icing, use the same procedure as the one for the eyes, and add food coloring.
!Ummm, tienen que estar buenísimas, además de ser muy vistosas….dará penita comerlas.
Muchos besines desde España y muchas gracias.
saly
Para ser las primeras te han quedado de lujo…… 🙂
Yo me he apuntado a un curso de galletas de navidad….. ya te contaré.
Ey, ya me contarás qué tal, aquí no los he encontrado, pero si no sí que me apuntaba también. Lo mismo te pido fotocopia de los apuntes 😉
Pues para ser la primera vez te han quedado fantásticas. Has detallado mucho la preparación, muchas gracias!.
Mmm… buena pinta graciasssss
:):):):):)